風柳メモ

ソフトウェア・プログラミング関連の覚書が中心

ZIPファイルに日本語ファイル名が含まれる場合の文字化け予防方法(Windows7, CentOS 6)

他のシステムで作成されたZIPファイルを解凍した際に日本語ファイル名が文字化けする不具合への対処法をいくつか。


Windows7 の場合

標準の状態だと、Shift-JIS(CP932)以外でエンコードされていると、文字化けする。

これまでは

無料圧縮・解凍フリーソフト CubeICE - CubeSoft

などを使うことで対処していたが、日本語ファイル名が UTF-8 でエンコードされているものについては、Windows7・Windows Server 2008 R2 用 Hotfix を適用すれば解消される模様。

File names are corrupted after you decompress a .zip file in Windows 7 or in Windows Server 2008 R2

CentOS 6 の場合(unzip)

CentOS 6 系で yum を使ってインストールできる unzip (CentOS 6.6では現在 unzip-6.0-2.el6_6.x86_64) では、日本語ファイル名には未対応のため、エンコードに関わりなく文字化けしてしまう。

【UTF-8 エンコード時】

$ /usr/bin/unzip -l ./AmazonMusicDownload.zip
Archive:  ./AmazonMusicDownload.zip
  Length      Date    Time    Name
---------  ---------- -----   ----
  8381815  10-11-2015 01:53   ?????????????(???????????????)/Cherish you/01 - Cherish you.mp3
  9099388  10-11-2015 01:53   ?????????????+?????????????????/?????????????+????????????????? ??????????????+??+????????+???????????????/01
- Blooming Lily.mp3
  8447415  10-11-2015 01:54   ?????????????+?????????????????/?????????????+????????????????? ??????????????+??+????????+???????????????/03
- ???????????????????????????.mp3
---------                     -------
 25928618                     3 files

【Shift-JIS エンコード時】

$ /usr/bin/unzip -l ./sjis-sample.zip
Archive:  ./sjis-sample.zip
  Length      Date    Time    Name
---------  ---------- -----   ----
        0  10-11-2015 10:59   ?????+???????????-????/?????+???????????-???? ?L?????N?^?[?C???[?W?\???O?W/
  9099388  10-11-2015 01:53   ?????+???????????-????/?????+???????????-???? ?L?????N?^?[?C???[?W?\???O?W/01 - Blooming Lily.mp3
  8447415  10-11-2015 01:54   ?????+???????????-????/?????+???????????-???? ?L?????N?^?[?C???[?W?\???O?W/03 - ?`???X?L?????_???X.mp3
        0  10-11-2015 10:59   ?X?????q??(???????F??)/Cherish you/
  8381815  10-11-2015 01:53   ?X?????q??(???????F??)/Cherish you/01 - Cherish you.mp3
---------                     -------
 25928618                     5 files


そこで、unzip 6.0 Shift-JIS対応版 をインストールすることで対応してみることに。

unzip 6.0 Shift-JIS対応版のインストール方法
$ git clone https://github.com/ted-n/unzip.git
$ cd unzip/unzip60
$ make -f unix/Makefile LOCAL_UNZIP="-D_FILE_OFFSET_BITS=64 -DNO_LCHMOD -D_MBCS -DNO_WORKING_ISPRINT" generic_gcc
$ sudo make -f unix/Makefile install

これで、/usr/local/bin 下にパッチの当たった unzip がインストールされる。
一行目を修正("git clone git@github.com:ted-n/unzip.git"としていたが、これは予めSSH Keyの設定が必要なため)

【UTF-8 エンコード時】

$ /usr/local/bin/unzip -l ./AmazonMusicDownload.zip
Archive:  ./AmazonMusicDownload.zip
  Length      Date    Time    Name
---------  ---------- -----   ----
  8381815  10-11-2015 01:53   氷堂美智留(矢作紗友里)/Cherish you/01 - Cherish you.mp3
  9099388  10-11-2015 01:53   冴えない彼女の育てかた/冴えない彼女の育てかた キャラクターイメージソング集/01 - Blooming Lily.mp3
  8447415  10-11-2015 01:54   冴えない彼女の育てかた/冴えない彼女の育てかた キャラクターイメージソング集/03 - 饒舌スキャンダラス.mp3
---------                     -------
 25928618                     3 files

【Shift-JIS エンコード時】

$ /usr/local/bin/unzip -l ./sjis-sample.zip
Archive:  ./sjis-sample.zip
  Length      Date    Time    Name
---------  ---------- -----   ----
        0  10-11-2015 10:59   冴えない彼女の育てかた/冴えない彼女の育てかた キャラクターイメージソング集/
  9099388  10-11-2015 01:53   冴えない彼女の育てかた/冴えない彼女の育てかた キャラクターイメージソング集/01 - Blooming Lily.mp3
  8447415  10-11-2015 01:54   冴えない彼女の育てかた/冴えない彼女の育てかた キャラクターイメージソング集/03 - 饒舌スキャンダラス.mp3
        0  10-11-2015 10:59   氷堂美智留(矢作紗友里)/Cherish you/
  8381815  10-11-2015 01:53   氷堂美智留(矢作紗友里)/Cherish you/01 - Cherish you.mp3
---------                     -------
 25928618                     5 files
Python で Shift-JIS エンコードしたファイル名で圧縮する場合の注意

自分はこれまで、Linux(CentOS) 上の Python で日本語ファイル名を含んだ ZIP ファイルを作成する場合でも、Windows で扱いやすくするために Shift-JIS(CP932) でエンコードしたファイル名で圧縮していたのだが、こうして作成したファイルを上記のパッチ済みの unzip で表示すると、なぜか文字化けしてしまった。

【オリジナルの unzip 6.0 使用時】

$ /usr/bin/unzip -l ./test.zip
Archive:  ./test.zip
  Length      Date    Time    Name
---------  ---------- -----   ----
      400  10-11-2015 15:57   ???{????f?B???N?g??/???{???t?@?C????.txt
---------                     -------
      400                     1 file

【パッチ済みの unzip 使用時】

$ /usr/local/bin/unzip -l ./test.zip
Archive:  ./test.zip
  Length      Date    Time    Name
---------  ---------- -----   ----
      400  10-11-2015 15:57   傔
                                ・fB
                                    Ng
                                      /傔
                                         黎@C
                                             シ.txt
---------                     -------
      400                     1 file

調べてみると、どうも ZIP ファイルヘッダの version(ZipInfo.create_system) が 3 (Unix) になっているとこの現象が発生するようなので、これを考慮して Python スクリプトを作成する必要がある模様。
zipfile.py の class ZipInfo の定義を見てみると、sys.platform が 'win32' のときは self.create_system に 0 が、それ以外は 3 がデフォルトで設定されている。

【例】

import czipfile as zipfile
import datetime

zip = zipfile.ZipFile( 'test.zip', 'w' )
timestamp = datetime.datetime.now()
dir_filename = u'日本語のディレクトリ/日本語ファイル名.txt'
content = 'test' * 100

zipinfo = zipfile.ZipInfo(
  filename = dir_filename.encode( 'cp932', 'replace' ),
  date_time = ( timestamp.year, timestamp.month, timestamp.day, timestamp.hour, timestamp.minute, timestamp.second )
)
zipinfo.compress_type = zipfile.ZIP_DEFLATED
zipinfo.create_system = 0 # 0 - MS-DOS and OS/2 (FAT / VFAT / FAT32 file systems), 3 - UNIX (https://pkware.cachefly.net/webdocs/casestudies/APPNOTE.TXT)

zip.writestr( zipinfo, content )
zip.close()
$ /usr/local/bin/unzip -l ./test.zip
Archive:  ./test.zip
  Length      Date    Time    Name
---------  ---------- -----   ----
      400  10-11-2015 15:59   日本語のディレクトリ/日本語ファイル名.txt
---------                     -------
      400                     1 file

追記(2015/10/26)

【覚書】はてなブログのレスポンシブWebデザイン対応

ほんとうに今更ながら、はてなブログはテーマ(テンプレート)によってはレスポンシブWebデザインに対応していることに気付く。
スマートフォンでアクセスする際に「PCのときとURLが変わってしまうのは不便だなー」と思っていたことだし、本ブログも対応してみることに。

手順1:レスポンシブ対応のテーマをインストール

テーマ ストアでレスポンシブ対応のテーマを探してインストール。
なお現状、レスポンシブ対応のテーマを探す機能などはないので、自力で探すしかない。

自分は、たまたま目についたシンプルな

Simple Gray - テーマ ストア - はてなブログ

をインストールしてベースにさせていただいた。


今気が付いたが、レスポンシブ対応テーマを探すには、

はてなブログのレスポンシブデザイン対応のテーマ集24個【随時更新】(スマホでもPCとほぼ同じ表示になるテンプレート) - 広汎性発達障害の女が毒を吐くブログ

の記事が便利そう。

手順2:CSS等の調整

デザイン設定で、CSSを適当に(好みに合わせて)調整。
自分の場合、はてなダイアリーのときに使用していたテーマの色合いが気に入っていたので、それに近い感じにしてみた。

また、ヘッダの下に検索フォームを設置し、画面の横幅が 1150px 以下のときには表示されるようにしておいた。
サイドバーが下に落ちて、検索フォームにアクセスしづらくなったときの代用。

手順3:レスポンシブ(スマートフォン)対応設定

デザインCSS先頭に、

/*
  Responsive: yes
 */

のようなコメントを追加したのち、スマートフォン→詳細設定にて、☑ レスポンシブデザインにチェックを入れる。

参考

レスポンシブデザインのテーマを作成する際の注意点

デザインCSSに Responsive: yes のコメントを入れるのは、忘れやすいので注意。

気が付いたら jQuery 用の highlight プラグインを書いていた

先日、自分のココログを全文検索するブログパーツ: 暴想の改修を行っていたのだが、furyu.tea-nifty.com
元のスクリプトのハイライト処理だと、TEXTAREA 内まで置換されてしまうのが難点だったため、せっかくなので jQuery を用いて実装してみた。github.com

$.setHighlightColor('yellow'); // .highlight要素に付けるハイライト(背景)色を指定(引数を指定しない場合、デフォルト(#ffcc33)になる)

$('p').highlight('キーワード'); // 全 p 要素内で、"キーワード" というテキストをハイライトする(引数として配列を指定することで、複数のキーワード指定も可能)

$('p').unhighlight(); // 全 p 要素内のハイライトを取り消す

style・script・textarea・iframe・frame 要素内は避けてハイライトするようになっている。
highlight()のオプションはjQuery Highlight Plugin | bartaz @ GitHub互換っぽくなっているはず。

裏話

最初はjq-cocolog_ajax_search.js内にベタ書きしていたのだが、せっかく jQuery 化したことだし、プラグインとして独立させることに。

例によって、ひととおり実装したところで、ふと検索してみると、
highlight: JavaScript text higlighting jQuery plugin
とか、
jQuery Highlight Plugin | bartaz @ GitHub
といったプラグインが見つかったので、オプションは後者のものと互換っぽくしておいた。
すなおに最初から調べて使っておけ、という話。

Google ChromeにてDOMノード追加に異様に時間がかかる現象が発生して悩む→拡張機能が原因だった

JavaScriptでページ遷移用のナビゲーションを作っていたのだが、リンクと半角スペース(テキストノード)とを交互に挿入するような実装にしていると、なぜか異様に時間がかかってしまう(数百個程度のノード挿入に、数秒要する)。
どうやら、ナビゲーションのノードがDOMツリー上にあるとこうなるようで、いったんDOMツリーから切り離した状態で作成し、最後にDOMツリーに戻すようにすると、ほとんど時間はかからない。でもなぜ……?


さんざん悩んだが、結局はとある拡張機能が原因だった、というオチ(今回の場合ははちまバスター)。
もっと早くに、シークレットウィンドウで調べておくべきだった……。
【追記】なお、はちまバスターは早々に改修された

テスト

function test_add_nodes( options ) {
    if ( ! options ) {
        options = {}
    }
    var parent_node = ( options.parent_node ) ? options.parent_node : document.body,
        before_processing = !! ( options.before_processing ),
        node_number = ( 0 < options.node_number ) ? options.node_number : 300,
        exclude_link = !! ( options.exclude_link ),
        exclude_text = !! ( options.exclude_text );
    
    var container = document.createElement('div'),
        link_node_template = document.createElement('a');
        text_node_template = document.createTextNode('');
        before_time = new Date().getTime();
    
    if ( parent_node && before_processing ) {
        parent_node.insertBefore( container, parent_node.firstChild );
    }
    for ( var ci=0; ci < node_number; ci++ ) {
        if ( ! exclude_link ) {
            var link_node = link_node_template.cloneNode( true );
            link_node.href = '#';
            link_node.innerHTML = ci;
            container.appendChild( link_node );
        }
        if ( ! exclude_text ) {
            var text_node = text_node_template.cloneNode( true );
            text_node.textContent = '*';
            container.appendChild( text_node );
        }
    }
    if ( parent_node && ( ! before_processing ) ) {
        parent_node.insertBefore( container, parent_node.firstChild );
    }
    var after_time = new Date().getTime(),
        elapsed_time = ( after_time - before_time );
    
    return elapsed_time;
}

function log_result( test_name, elapsed_time ) {
	console.log( test_name + ' : ' + ( elapsed_time / 1000.0) + ' sec' );
}

// DIV要素にリンクやテキストノードを一通り追加してから、DOMツリーに挿入
log_result( 'after , text only', test_add_nodes( { before_processing : false, exclude_link : true, exclude_text : false } ) );
log_result( 'after , link only', test_add_nodes( { before_processing : false, exclude_link : false, exclude_text : true } ) );
log_result( 'after , both     ', test_add_nodes( { before_processing : false, exclude_link : false, exclude_text : false } ) );

// DIV要素をDOMツリーに予め挿入してから、リンクやテキストノードを追加
log_result( 'before, text only', test_add_nodes( { before_processing : true, exclude_link : true, exclude_text : false } ) );
log_result( 'before, link only', test_add_nodes( { before_processing : true, exclude_link : false, exclude_text : true } ) );
log_result( 'before, both     ', test_add_nodes( { before_processing : true, exclude_link : false, exclude_text : false } ) );
拡張機能有効時
after , text only : 0.003 sec
after , link only : 0.057 sec
after , both      : 0.054 sec
before, text only : 0.04 sec
before, link only : 0.04 sec
before, both      : 6.856 sec // これは酷い
拡張機能無効時
after , text only : 0.002 sec
after , link only : 0.005 sec
after , both      : 0.01 sec
before, text only : 0.027 sec
before, link only : 0.045 sec
before, both      : 0.05 sec

【覚書】Google Fusion Tables に Python でアクセスする手順

Google Fusion Tables の更新は、実際には、自前のLinuxサーバー等から自動的に行うことを考えているため、まずは Linux 端末上から Fusion Tables にアクセスできる方法を調べる必要がある。
この場合、Linux 端末側は、OAuth 2.0 クライアントとして Fusion Tables API を使用することになるらしい。developers.google.com
で公開されている各プログラミング言語用のライブラリを用いることで、アクセスできるのだと思われる。
とりあえず、ある程度使い慣れている Python 2.7 によるアクセスを行うことを試みた。
いろいろと調べつつ、手探りで試してとりあえずアクセスは出来たが、これが正しい方法なのかどうかは自信がない。もっとスマートなやり方がありそうな気がするが……。

OAuth 2.0 クライアントID&シークレットの取得

Google Developers Consoleを開き、Fusion Tables へのアクセス用に、新しいプロジェクトを作成する。
f:id:furyu-tei:20150819212036p:plain
f:id:furyu-tei:20150819212043p:plain
f:id:furyu-tei:20150819212048p:plain


作成したプロジェクトを開き、
f:id:furyu-tei:20150819212051p:plain
左のメニューの
APIと認証 → API
から、Fusion Table API を選んで
f:id:furyu-tei:20150819212054p:plain
[APIを有効にする]を押す。
f:id:furyu-tei:20150819212100p:plain


次に、同じく
APIと認証 → 認証情報
から、
[認証情報を追加] → OAuth 2.0 クライアント ID
を選択し、
f:id:furyu-tei:20150819212111p:plain
[同意画面を設定]ボタンを押して
f:id:furyu-tei:20150819212117p:plain
サービス名を適当につけて入力し、[保存]を押す。
f:id:furyu-tei:20150819212123p:plain


「アプリケーションの種類」は「○ その他」を選択し、[作成]ボタンを押すと、
f:id:furyu-tei:20150819212128p:plain
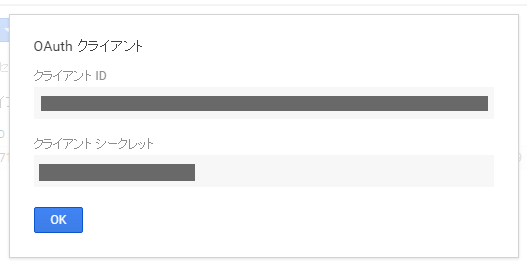
OAuth 2.0 のクライアントID及びクライアントシークレットが発行されるので、[OK]を押す。
これは後からでも確認できるため、特にコピーしておく必要などはない。
f:id:furyu-tei:20150819212142p:plain

OAuth 2.0 クライアントID情報は、右側にあるダウンロードボタンにて、JSON形式でダウンロードできる。
f:id:furyu-tei:20150819212153p:plain


Linux 端末(OAuth 2.0 クライアント)側の準備

Installation  |  API Client Library for Python  |  Google Developers
に従い、

sudo pip install --upgrade google-api-python-client

のようにして、google-api-python-client をインストールしておく。


Python で Fusion Tables にアクセスするサンプルコード(sample_fusiontables.py)

上記でダウンロードしたJSON(OAuth 2.0 クライアントID情報)ファイルを、
client_secrets.json
という名前にして同じディレクトリに配置した状態で実行すると、アクセス可能な Fusion Tables の最初のテーブルIDを取得し、当該テーブルの行列を表示するサンプル。

# -*- coding: utf-8 -*-

# OAuth 2.0 for Devices (sample code)
# https://github.com/google/oauth2client/blob/master/samples/oauth2_for_devices.py

# Using OAuth 2.0 for Devices
# https://developers.google.com/accounts/docs/OAuth2ForDevices

# Fusion Tables REST API
# https://developers.google.com/fusiontables/docs/v2/reference/

from __future__ import print_function

import sys
import json
import time
import datetime
import httplib2
import traceback
from pprint import pprint
from oauth2client import client
from googleapiclient.discovery import build

def get_credentials(scopes, client_secret_file = None, credential_file_in = None, credential_file_out = None): #{
  def load_credential_file(credential_file_in):
    if not credential_file_in:
      return None
    try:
      fp = open(credential_file_in, 'rb')
      credentials = client.OAuth2Credentials.new_from_json(fp.read())
      fp.close()
      if credential_file_in != credential_file_out:
        save_credential_file(credential_file_out, credentials)
      return credentials
    except Exception, error:
      #print(traceback.format_exc())
      pass
    return None
    
  def save_credential_file(credential_file_out, credentials):
    if not credential_file_out:
      return
    fp = open(credential_file_out, 'wb')
    fp.write(credentials.to_json())
    fp.close()
  
  credentials = load_credential_file(credential_file_in)
  if credentials:
    return credentials
  
  client_secrets = json.load(open(client_secret_file, 'rb'))
  client_id = client_secrets['installed']['client_id']
  client_secret = client_secrets['installed']['client_secret']
  
  while not credentials:
    flow = client.OAuth2WebServerFlow(client_id, client_secret, ' '.join(scopes))
    
    # Step 1: get user code and verification URL
    # https://developers.google.com/accounts/docs/OAuth2ForDevices#obtainingacode
    flow_info = flow.step1_get_device_and_user_codes()
    
    print('Verification URL: {0}'.format(flow_info.verification_url));
    print('User code: {0}'.format(flow_info.user_code));
    
    user_code_expiry = flow_info.user_code_expiry
    interval = flow_info.interval
    
    while datetime.datetime.now() < user_code_expiry:
      print('\r{0:>4} seconds remaining'.format( (user_code_expiry - datetime.datetime.now()).seconds ), end = '')
      sys.stdout.flush()
      # Step 2: get credentials
      # https://developers.google.com/accounts/docs/OAuth2ForDevices#obtainingatoken
      try:
        credentials = flow.step2_exchange(device_flow_info = flow_info)
        if credentials:
          break
      except Exception, error:
        #print(traceback.format_exc())
        credentials = None
      time.sleep(interval)
    print('')
  
  save_credential_file(credential_file_out, credentials)
  
  return credentials
#} // end of get_credentials()


if __name__ == '__main__': #{
  # https://console.developers.google.com/project/<project name>/apiui/credential (Download JSON)
  CLIENT_SECRET_FILE = 'client_secrets.json'
  
  # Allowed scopes
  # https://developers.google.com/identity/protocols/OAuth2ForDevices#allowedscopes
  SCOPES = ('https://www.googleapis.com/auth/fusiontables',)
  
  CREDENTIAL_FILE = 'credentials.json'
  
  credentials = get_credentials(
    client_secret_file = CLIENT_SECRET_FILE,
    scopes = SCOPES,
    credential_file_in = CREDENTIAL_FILE,
    credential_file_out = CREDENTIAL_FILE,
  )
  
  print('Access token: {0}'.format(credentials.access_token))
  print('Refresh token: {0}'.format(credentials.refresh_token))
  
  # Get Fusion Tables service
  # https://developers.google.com/accounts/docs/OAuth2ForDevices#callinganapi
  fusiontables = build(
    serviceName = 'fusiontables',
    version = 'v2',
    http = credentials.authorize( httplib2.Http() ),
  )
  
  # Fusion Tables REST API
  # https://developers.google.com/fusiontables/docs/v2/reference/
  
  # https://developers.google.com/fusiontables/docs/v2/reference/#Table
  Table = fusiontables.table()
  
  # https://developers.google.com/fusiontables/docs/v2/reference/#Column
  Column = fusiontables.column()
  
  # https://developers.google.com/fusiontables/docs/v2/reference/#Template
  Template = fusiontables.template()
  
  # https://developers.google.com/fusiontables/docs/v2/reference/#Style
  Style = fusiontables.style()
  
  # https://developers.google.com/fusiontables/docs/v2/reference/#Query
  Query = fusiontables.query()
  
  # https://developers.google.com/fusiontables/docs/v2/reference/#Task
  Task = fusiontables.task()
  
  # ===== Samples
  print('***** Tables')
  table_list = Table.list().execute()
  pprint(table_list)
  tableId = table_list['items'][0]['tableId']
  
  print('***** Columns & Rows')
  rows = Query.sql(
    sql = 'SELECT * FROM {0}'.format(tableId)
  ).execute()
  pprint(rows)

Shell 上から、

$ ls
client_secrets.json  sample_fusiontables.py
$ python ./sample_fusiontables.py

のように実行すると、初回には、標準出力上に

Verification URL: https://www.google.com/device
User Code: XXXX-XXXX
xxxx seconds remaining

のように表示されて待ち状態に入る。

手動で「Verification URL」に示された URL にブラウザでアクセスすると、(場合によってはアカウント選択・ログイン画面の後で)端末に表示されるコードの入力を促されるため、「User Code」で示されたコードを入力し、[続行]を押す。
f:id:furyu-tei:20150819212158p:plain
Fusion Tables の管理の許可を求められるため、[承認する]を押す。
f:id:furyu-tei:20150819212207p:plain


すると、しばらくしてサンプルプログラム側が承認を認識し(Access token・Refresh tokenを取得し)、結果が表示される。


なお、Access token・Refresh tokenを含む情報は、カレントディレクトリ上の
credentials.json
というファイルに書き込まれ、

$ ls
client_secrets.json  credentials.json  sample_fusiontables.py

次回実行時にはこれを読み込んで使用するため、基本的には、上記のブラウザによる手動の承認手順は初回のみでよい。
この動作の詳細は、上記ソースコード中の get_credentials() 関数の定義及び呼び出し箇所を参照のこと。